 |
www.eclipse-chasers.com Lunar Eclipse Photography Author: Bill Kramer Last update: Saturday, 18-Apr-2015 11:59:51 EDT |
Eclipse Chaser
(noun) - Anyone that wants to see a total solar eclipse.  Search Eclipse Chasers Site
 |
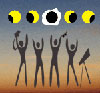
Lunar Eclipse Photography
by Bill Kramer
Photography of a lunar eclipse event is easy, provided you have the right equipment. The basic requirements are a camera with a tripod. The best lunar eclipse pictures are obtained when using a long focal length lens (small telescope) and a guided mount.
Setting up for a lunar eclipse is just like setting up for a night of star gazing or astrophotography. The event lasts several hours as the moon is slowly covered in shadow and then takes on a deep orange-brown color. As the moon gets darker, more stars appear to the eye. The change is subtle and not as dramatic as a total solar eclipse. All this makes the job of the photographer easier.
There are two things to consider when taking a picture of a lunar eclipse - the image size and the exposure .

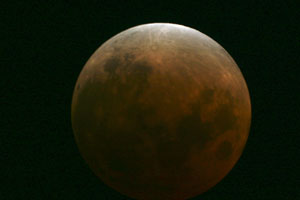
Image Size
Calculate the image size of any astronomical object by multiplying the size of the object as measured in seconds of arc by the focal length of the camera divided by 200,000. The result will be in the same units of measure as the focal length.
The moon is roughly 1860 seconds of arc in size (31 minutes or just over half a degree). When you divide 1860 into 200,000 the result is 0.0093 which is multiplied by the focal length to achieve the image size.
Out in the field you can approximate this same result by just dividing the focal length of the lens by 100 to achieve the image size.
The trick is to match the image size with your film or image plane size. For the eclipsing moon the best results will be about 50 to 70 percent of the image plane size.
For example when using 35mm film the size is about 24mm by 36mm. A good image size will be between 12 and 18 mm. The lens recommendation would be somewhere between 1200mm to 1800mm (image size multiplied by 100 for approximation). When using a digital camera with an image size 1.6 times smaller, divide those values by 1.6 to get a recommended value between 750 to 1125 mm.
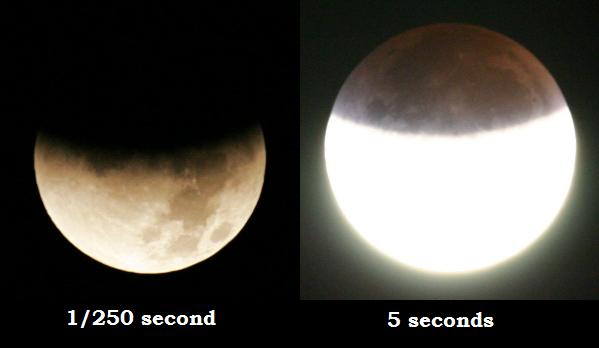
Exposure
During totality the moon is dark. It is not completely dark though. Light refracted through the Earth's atmosphere will shed some light on the subject. The moon will be a ruddy-brown-orange color and depending on the atmospheric conditions, elevation above the horizon, and relative background light; it will be either a "bright" or "dark" eclipse. As a consequence, the photographic exposures provided below are estimates at best and it is strongly recommended that you shoot a series of varying exposures that bracket the times. These guidelines were adapted from previous publications and experience.
The exposure setting you use is a function of the speed or ASA rating of the film or digital camera setting. The other main variable is the focal ratio. The focal ratio (f/) is obtained by dividing the size of the objective lens into the focal length of the optical system.
| Event | ASA 100 | ASA 200 | ASA 400 | ASA 800 |
| Full Moon | 1/250 f/11 |
1/250 f/16 |
1/250 f/22 |
1/500 f/22 |
| Penumbra Shadow | 1/60 f/11 |
1/60 f/16 |
1/125 f/16 |
1/250 f/16 |
| 2nd and 3rd contact | 1 f/2.8 |
1 f/4 |
1/4 f/2.8 |
1/8 f/2.8 |
| Totality | 2 f/2 |
2 f/2.8 |
1 f/2.8 |
1/2 f/2.8 |
To use the numbers from the table with your own telescope/camera you must first calculate the focal ratio (f/) of your system. Do this by taking the focal length (FL) and divide that by the diameter (D) of the objective or main lens.
f-ratio = FL / D
Divide the f-ratio of your system by the f/ number from the chart. To find the f/number in the chart to use, cross match the subject you are shooting along with the film speed you are using.
Fdiff = f-ratio / f-value from chart
Now create a multiplication factor (M). This factor will be applied to the time value from the chart. Square the Fdiff value to obtain the multiplier.
M = Fdiff * Fdiff
Use the multiplier (M) against the recommended exposure time to yield the recommended exposure to use.
Exposure = M * Exposure value from chart
Note that this is just one method for determining exposure times. It is based on a Kodak publication named "Astrophotography Basics".
Example: 90mm MAK telescope with a FL of 1200mm.
f-ratio = 1200 / 90 is 13.3 meaning the scope/camera system is an f/13.3 lens setting. You cannot adjust this value unless you use a tele-extender to increase the value or use a barlow lens to double the effective focal length thereby changing the f-ratio. You can adjust the exposure. And that is what this equation is used for.
Using ASA 400 speed film, the recommended exposure and f/ settings are 1 second and f/2.8. To calculate an initial exposure estimate divide 2.8 into 13.3 to get Fdiff.
Fdiff = 13.3 / 2.8 = 4.75
Now square that value to get the M value.
M = 4.75 * 4.75 = 22.56
Multiply M by the recommended exposure to determine the initial estimated exposure to use.
Exposure = 1 second * 22.56 = 22.56 seconds.
The value just calculated will work well for a very dark eclipse, and it is strongly recommended that instinct and experience be trusted since the atmospheric conditions will greatly effect the results. Bracket the exposures plus or minus 15%. If using a digital camera, check your results immediately to get the best exposures.
If 22 seconds seems high, remember, the moon will be very dark during mid-totality. For eclipses that occur away from the darkest part of the umbra shadow the exposures may be less since the surface will be illuminated somewhat. Off center eclipses tend to be brighter towards one side. To show the range of colors and shades I would bracket the result obtained above from 15 seconds to 30 seconds depending on how bright the eclipse appears in the sky.

Partial Eclipse underway - 400mm f5.6
Partial Eclipse - Questar prime focus (~f14)
